
Adding date filters to a Dashboard in Lightning is no different from adding any other field filter – as long as the field is shared across all Dashboard Components, the field will be available to you for filtering.
An example of a date filter on a Dashboard might be that you have a series of reports related to Contacts, but you only want it to include Contacts created in the last year; with a filter, you can achieve this.
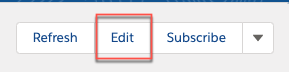
- Go to the Dashboard you wish to modify and click the Edit button.
2. Click the +Filter button from the Edit screen.

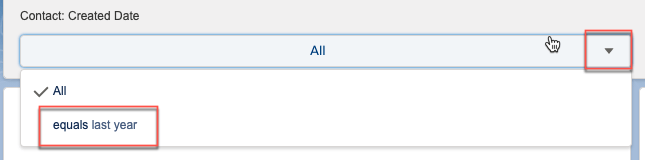
3. Search for the field you want to use as the filter – in my case, Contact Created Date. Then set the filter value based on your desired behavior, in my scenario, created in the last year.

4. After you click Apply, click Add. You will then see it in the top left of your Dashboard. Once you click Save and go back to the Dashboard in view mode, you can use the dropdown to select your filter.
That’s it! Now you have a Dashboard filter. You can have a total of three filters per Dashboard.
